
Estimated reading time: 5 minutes
Have you done any grafting this year? Were your grafts successful? We use grafting to grow our own trees from scratch, but also as part of our ‘continuous improvement strategy’ in the garden.
It’s a great way to replace dead trees, add pollinisers, or create multigrafts to reduce gluts in the garden — we recommend the practice to anyone who has fruit trees.
Whether you’re just learning how to graft or have been doing it for years like us, it’s super-exciting when you get to see whether your grafts have been successful!
Seeing the results of fruit tree grafting
Grafting demands a certain measure of patience. Regardless of whether you’re using summer bud-grafting or winter grafting techniques, there’s always a built-in waiting period before you know whether it’s worked or not.
In our on-farm fruit tree nursery — Carr’s Fruit Tree Nursery — we usually do our winter grafting in September. By November, we can see whether they worked or not.
Bud-grafting involves the longest wait time. This technique is done in summer, usually around February for us. But you don’t get confirmation on whether it was successful until the following spring.
The waiting is always a time of some trepidation. But in the end, there’s no “maybe”. You’ll be able to clearly see whether your grafting worked or not and be faced with irrefutable evidence of the quality of your grafting technique.
The keys to getting good grafting results
We’re very familiar with the feeling of having to own your results. Our grafting mentor (and Katie’s dad), Merv, is always there teaching and advising us. But he handed over the actual grafting to us years ago — so there’s no hiding. The success or failure is ours alone.
It’s the same for our Grow Great Fruit members. We teach them the techniques and are available to guide and mentor them, but they’re the ones who have to practice the knife skills.
After years of teaching beginners how to graft, we’ve learned that the secrets to success are practice, persistence, and refinement.
Grafting might not work the first time you try it, but it’s quite common for people to get some early wins. And over time, the success rate just keeps improving, which is incredibly satisfying!
Grafting aftercare
All grafting requires careful aftercare, which can make the difference between whether your graft grows well or fails.
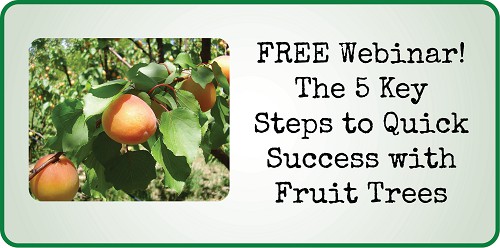
For example, in late winter, you need to check whether the buds you grafted the previous summer have “taken”.
If they’re still looking green and sprightly, it’s time to cut the rootstock back to the bud grafting site. But a healthy-looking bud at this stage is not a guarantee of success, and the bud may still die back.
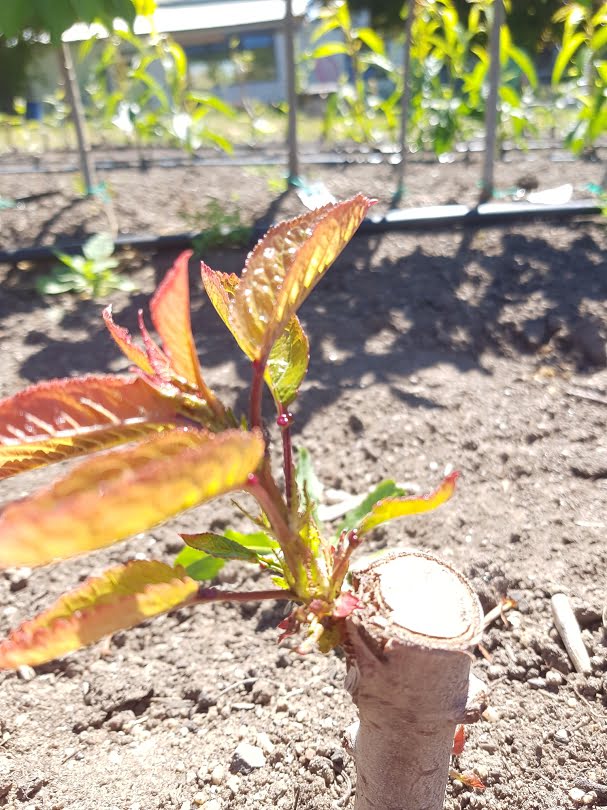
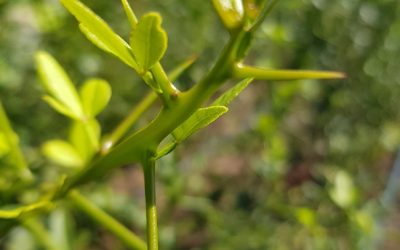
You’re never really sure of the outcome until you see lovely new growth coming from the bud like this:
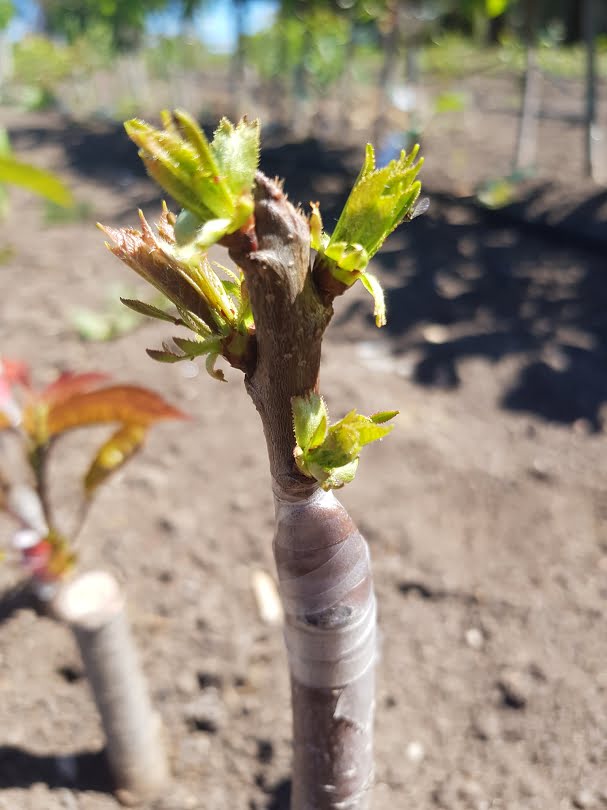
Other aftercare jobs include:
- Removing the grafting bandage/tape and checking that the graft union is secure;
- Replacing the bandage if the union still needs support;
- Removing any shoots growing from the rootstock;
- Pruning the graft if it grows well enough (follow the principles of establishment pruning to guide you).
Grafting demands learning a few key skills, understanding what you’re trying to achieve, and paying small bits of attention at regular intervals throughout the seasons.
But the thrill of success is more than enough reward!
Extra grafting resources
Want to delve deeper into the world of grafting? Hooray! We LOVE grafting, and reckon it’s one of the most addictive gardening techniques (especially once you taste your first success!). Grafting is in danger of becoming a lost art, which is one of the reasons we encourage all fruit tree owners to give it a go.
🔪 Fruit tree grafting for home gardeners
🔪 Grow your own fruit trees for free — Learn the ancient skills of growing your own fruit trees from seed or cutting, and grafting them.
🔪 Grafting technique #1 — Whip-tongue grafting
🔪 Grafting technique #2 — Cleft grafting
🔪 Grafting technique #3 — Bark grafting
🔪 Grafting technique #4 — Summer grafting (budding)
🔪 Growing fruit trees for free by root grafting
🔪 How to grow your own multigraft or fruit salad tree

Related Articles

Where to get fruit trees (and how nurseries work)
Our goal is to send our organic fruit trees to good homes (and gardens) far and wide. There’s always room for one more fruit tree, right?
Grafting citrus – ouch!
Grafting citrus is a great way to change varieties or create a new tree, as long as you can avoid those potentially painful prickles.
Pruning Fruit Trees
Use this foolproof 7-step method for pruning fruit trees. Learn how to keep your trees happy and productive with ease and confidence.
I have finally go a seed to grow so that will be my root stock but I have to be patient as it wont be big enough till next season but cant wait so exciting
Oof, isn’t the waiting hard Karen! Well done on getting this far though, Meg – Grow Great Fruit team.