Estimated reading time: 5 minutes
In our long career growing and picking fruit, we’ve frequently come across broken branches in our fruit trees.
Related Articles

How to plant a fruit tree – the easy way
Everything you need to know about how to plant your new fruit trees to get them off to a great start in life.

Fruit tree training
Sometimes pruning isn’t enough to achieve the shape you want in your fruit tree, and some extra training is required.

Establishment pruning
Doing establishment pruning as soon as you plant new trees helps to establish branches where you need them in the tree.
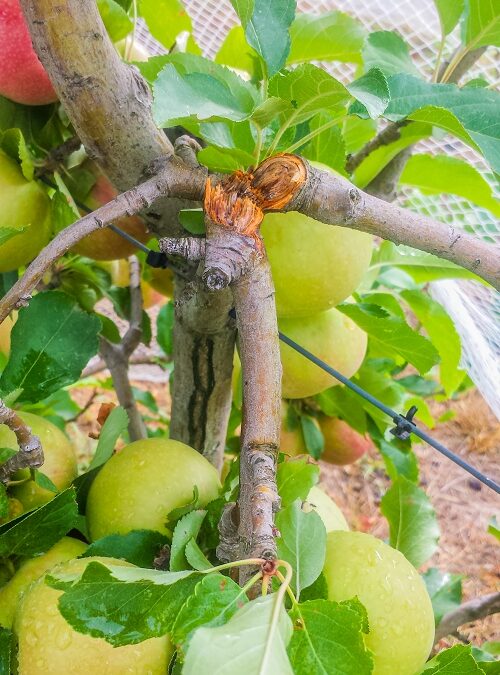
The broken branch in the Granny Smith apple tree (above) is a case in point. Here’s another one in an apricot tree…

This should never happen. Managing the fruit load on your fruit trees (mainly with thinning) should only ever leave as much fruit as the branch can safely hold without breaking.
Clearly, how much fruit is allowed to grow on any particular branch is not something you can just leave up to the tree. Fruit trees will regularly set more fruit than their branches can carry.
This is even more true if they’ve been allowed to fall into a “biennial bearing” pattern, where they have a heavy crop one year followed by a very light crop the year after.
Branches can break for other reasons of course. Our farm borders a Regional Park with a large kangaroo population, so one of the common causes at our place is clumsy kangaroos.

Misadventure with equipment, other animals, storms, or disease can also cause breaks.
Can broken branches be repaired?
Once the damage is done, the next question is “can it be repaired?” We’re often asked whether broken branches should just be removed completely.
Well, it depends.
If the break has gone all or most of the way through the wood (like the apricot branch at the top) then the answer is yes. Similarly, if the break has been caused by disease and the branch no longer has any healthy wood inside, then the best thing to do is make a neat pruning cut to remove the broken branch.
Remember, the first rule of pruning is “remove all dead and diseased wood”.
However, if there’s still enough healthy and green wood on both sides of the split that can be brought back together, it’s worth trying a repair.
How to do the repair
- Remove any fruit that’s on the branch.
- Bring the two pieces back together, and make sure you can get a really good union between the two sides.
- Tie or tape the pieces very firmly together.

It doesn’t really matter what you use to tie the two sides together. In the example above the split was on a fairly small branch. Some budding tape was handy in the pocket, so that’s what was used!
For a bigger split, for example in the trunk of a tree, you’ll need a more heavy-duty solution. Cable ties are great for this purpose because you can pull the two sides very tightly together.

You may also need to support the break with some rope or hayband (baling twine) while it repairs itself.
Leave the bindings in place to heal for at least a few months. Check back next spring to see whether the repair worked. If not, then it probably makes sense to remove the branch.
If your repair was successful thin the fruit on that limb extra hard next spring. The last thing you want to do to a new repair is put it under too much load.
Remove whatever you used to bind the break before it gets too tight. Keep an eye on the limb and supply extra support if necessary next season to make sure it doesn’t break again.
Prevention is better than cure
Even though summer is usually when the damage shows up, spring is the time to prevent it by thinning.
However, taking enough fruit off the branches to prevent these breaks in the first place can be very difficult. It feels awfully destructive to throw all that fruit on the ground. But it really is one of the best ways to protect the structure of your tree.
A little pro tip, while you’re thinning, is to look at the fruit on the tree, and avert your eyes from the fruit on the ground (this really does help you feel better about the job).
Before you start thinning, be sure to check out our handy chart to help you figure out how much fruit to remove. The amount you remove will vary depending on tree size, crop load, etc.
Our final pro tip? Do your fruit thinning, and then go back a couple of weeks later and just check how the tree looks. Chances are, you’ll need to do it again!


This article is fantastic !!! Thank you for the pics too really helped. Keep up the fantastic work:)
Thanks Paula, really glad you enjoyed the article. Cheers!
Thank you for this advice, I wish I had read it before pruning of a lovely horizontal branch that one of my chooks jumped onto and broke…I saw it happen but didn’t realise it might be an option to bind it together. Thanks again, Susan
Our pleasure Susan, hopefully your tree will grow some nice strong shoots for replacement limbs!
Thank you for this helpful article. One of the branches on my new baby lemon tree (Christmas present) snapped and hopeful it can be saved! The pics were very helpful! Fingers crossed!!
Hi,
I had a 4-5 year old crabapple tree split at the “apical branch” from a late spring snow. We were out of town, but the broken branch was still looking healthy around 7 days later, as the split was somewhat vertical. I grafted with cloth and rubberized wire and the tree seems to be doing well. It’s a pretty tight repair, is there a general rule when I need to remove the “bandaid” and put on a new version?
Thanks
What a great article! It looks like there’s some deadwood where the branch attached so we will be cutting the branch off. What do we do about the opening created by removing the branch?
If a branch is tore off our new 4 in one apple tree and there is about a 4 inches left of that branch. Can we save that part of the tree. It is a Gala apple branch.
Hi Terri, What a pity! You cn certainly wait tosee if that branch reshoots- it may or may not. If it dies back, then there’s not much you can do other than cut it off as flush with the main trunk as possible.
Can you use the split just like a graft and use the Cambeian layer to rebond the split. That’s Leemy plain, I’ll see if it works.
Yes, you could try this – let us know how you go Lee! Meg – GGF team.
Hello there, You’ve done an incredible job. I’ll certainly digg it and
personally recommend to my friends.I am confident they’ll be
benefited from this web site.
Thanks, we appreciate the recommendation!
Your info is so appreciated. I thank you for all the effort you put in to support others
Our pleasure Marg, glad you’re finding it useful
I managed to repair a very bad split of two major branches of my peach tree. Obviously too much fruit had weighed it down in wind. I drilled through the two branches where the split occurred and fixed with a large bolt and nut. An arborist was amazed but 3 years later it is healthy and my carpentry mind felt the method was obvious!!
That’s great Diana, not a method we’ve tried, but it sounds fantastic!
Hi Diane
This was the right idea after seeing your comment I decided it’s exactly what I am going to do to my apple tree that split from having a wet snow fall early fall.
Again thank you
Good luck with it Elbert, hope your tree recovers beautifully
Hello, this is very helpful. I have a young pear tree with multiple branches that are nearly vertical. I read about trying to train using wedges them so they grow at more of an angle. Unfortunately, when inserting a wedge, a limb snapped off completely, exposing a nasty gash at the crook where it branches and also peeling some bark down the leading trunk below the crook. Is there a tree equivalent of Neosporin and a Band-Aid that will help this heal?
Hi Sellmealemon, if you can somehow bandage the limb back together and hold it very firmly for a 6-12 months, then there’s a good chance it will heal. We tend to be more in favour of pruning to get branches in the shape and position you want them – we call it “establishment pruning”, and it’s explained in more detail here – https://growgreatfruit.com/product/pruning-young-fruit-trees/. Also, while pear trees tend to be very vertical when they’re young, they naturally spread as they get older and start bearing fruit, so they usually end up being a pretty nice shape anyway
New crimson King Maple. Sept 2020.
I broke leader, 3 ft from top.
1/3 through. Was bending to straighten.
Electrical tape above and below fracture.
Zip ties x 5.
Wooden paint stir stick for splint.
Worried all winter, April 2021, good leaves and this year some growth. Fracture never did leak sap.
Last month, I gently removed everything and relocated the bindings. Snug for winter.
Splinted two directions.
Tree trunk has one tie to keep it pulled verticle. Westerly.
Should I declare success and quit the worry?
I will redo Fall of 22.
Without that 3ft + leader, the tree is ruined.
Thanks
Dave
Thanks for your very useful advice. My young Tahitian lime tree was doing brilliantly and this is the first year it has had a crop of around 12 limes on one branch. They were nearly ready to harvest! Some people help me with the heavy gardening and unfortunately broke off the lateral branch with all the fruit. The branch is still attached but is heavy to lift with or without fruit. Since the branch is holding on by one centimetre, I suppose that I am wishfully thinking that I can tie that little bit of branch back to the main trunk. Sadly, it looks a bit like the pic at the top of your article.
One example is using zip ties. When should they be removed? When is the break healed or grown back that you don’t need to bind any more? Thank you.
Okay, I read down further and found the answer!
What care do I give to the hole created by nectarine tree branch breaking off with too much fruit?
My small (about five foot) orange tree lost the main trunk during a storm. There is a side branch that is growing well, and looks healthy. Should I just dig it up, or will it eventually grow straight? I live in Groveland, Fl. Thanks.
It’s a bit tricky to answer this question without seeing the tree, but with pruning you might well be able to still re-establish a good structure for your tree. Just make sure the sideshoot is above the graft rather than the rootstock! Meg – GGF team.
A large branch has broken on my plum tree. There is a lot of unripened fruit. How can save the fruit and the tree
Regarding the fruit, some plums can ripen well off the tree, they won’t be as flavoursome, but depends how close to ripening they were. Worth a shot to remove fruit from the fallen branch! And then following the advice in this blog, make a plan for how you might help the tree recover.
Do you know why the branch broke in this case? It could be worth looking at some of our resources on thinning for next time. Meg – GGF team.